Ender 6 Extruder Relocation

The Ender 6 is a great printer in many aspects, but one thing it has always been troubled with is stringing. The original location of the Ender 6 extruder motor is half way down the right hand of the frame. This design means a very long Bowden tube that results in terrible stringing and the need for fairly extreme retractions that still leave a less than perfect print.
Solution: Move the Extruder
Parts List
Extruder Mount:
- (2) M4x10mm socket cap screws
- (2) M4 t-slot nuts
Filament Guide:
- (2) M4x10mm socket cap screws
- (2) M4 t-slot nuts
If you don't have a bunch of these on stock I highly recommend getting yourself a couple of very inexpensive kits. These are some examples:
Instructions
The way to reduce stringing is to shorten the Bowden tube. Pushing and pulling a flexible filament through a flexile tube is never going to be as exact as we would like. So shorterning the tube should lessen the negative effects. The best way to do that without buying any new parts is to move the extuder closer to the hot end.
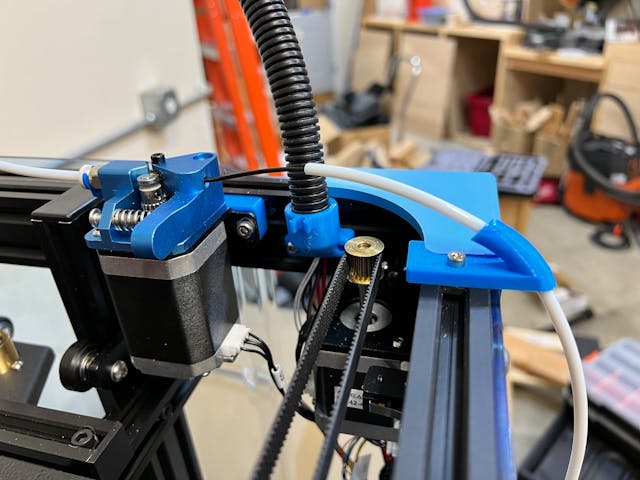
As it happens the Ender 6 design has a perfect spot for the extruder that seems like it was almost made for this change.
1. Print Parts
First before you disassemble the printer you will need to print these three items:


2. Remove the extruder

To start, you need to remove the extruder from its existing location on the side of the printer.

Unplug the cable and, of course, remove any filament that is threaded through it. Then just unscrew the extruder in the reverse of how you installed it when you first built the printer. Keep the screws.
3. Add the spacer

Take the spacer block you printed out and attach it to the extruder mounting plate using some M4 screws and T-nuts. (Note in the picture I printed my own t-nuts before my order arrived from Amazon)
4. Re-mount the extruder


Now attach the extruder motor to the top frame bar at the back to the right of the z-axis mount. Don't lose the spacer you just added. It may be a tight fit between the z-axis bar and the cable holder.
5. Bowden Tube
You will need to shorten the Bowden tube as much as you can to get the most benefit from this move. Before you trim it, move the print head to the furthest point from the extruder and measure the shortest length you think you can get away with. Remember you can always trim more later, but you can't add any back.
6. Add filament guide and filler plate

Attach the filament guide to the top of the frame using the other two M4 screws and nuts

Lastly, push the filler plate into the hole where the extruder used to be.
Now you should be all set to thread the filament through the guide and into the extruder. You should find that you can reduce the extraction distance in your slicer settings with good results.


Success!
Please leave comments here. I am always open to improving these posts
October 26, 2021 (5y ago)